Photoshop����ë����ʥ�Q�����w��Ӣ��
����Դ�� Tutsplus.com�����x���� Rose �o�҂����������ʵ����£�This tutorial will show you how to use brush settings, layer styles, healing tools, adjustment layers, and some tips and tricks to create a shiny, bright, fun tinsel text effect. Let's get started!
�ȿ���Ч���D

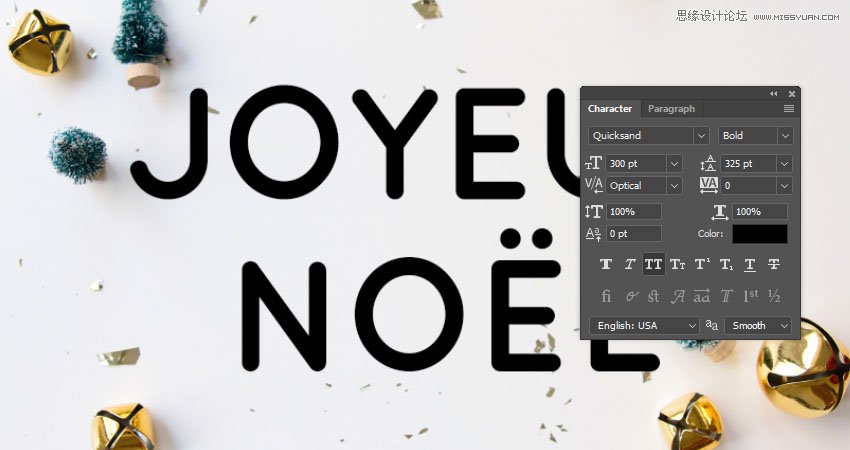
1. How to Create Background and Text Layers
Step 1
Create a new 1613 x 1075 px document, and go to File > Place Linked to open the Background Image.
Resize the Background Image to fit within the document and hit the Return key to commit the changes.

Step 2
Create the text in All Caps using the font Quicksand Bold. Change the Size to 300 pt, the Kerning to Optical, and the Leading value to 325 pt if you have multiple lines of text.
Place the text however you like, and don't worry about the background as we'll fix it at the end of the tutorial.
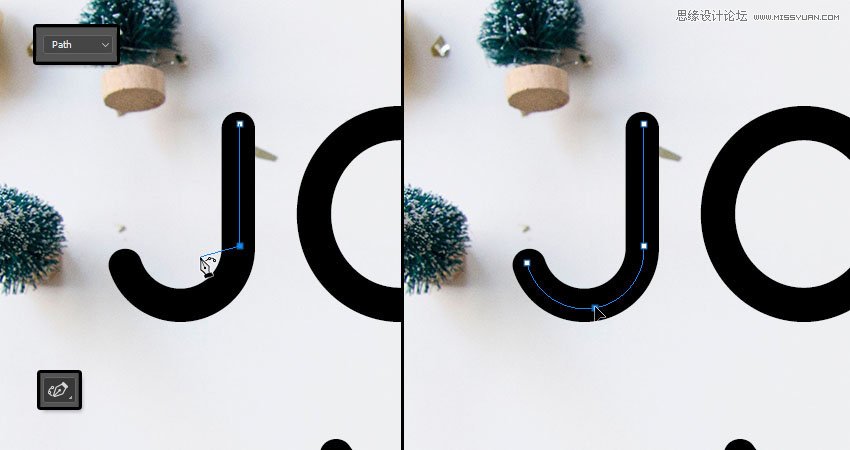
2. How to Create Inner Work Paths
Next, we are going to create work paths inside the letters we have.
You can do that using the Pen Tool, but in this tutorial, we are going to use Photoshop's new Curvature Pen Tool.
Step 1
Pick the Curvature Pen Tool, make sure to choose the Path option in the Options bar, and click once in the center of the first letter where you want to start creating the work path.
The Curvature Pen Tool is different from the Pen Tool. So to create corner points, you need to double-clickwhen you add the point, and to create a curve, you can either click once or create a straight line instead, and then click on that line to add a point and drag it to create the curve.
When you finish creating the path, Command-click anywhere outside it.
Step 2
You can also use any other shape tools to help you easily create the work path for some of the letters. For example, you can use the Ellipse Tool, with the Path option active, to create the work path for the letter O.
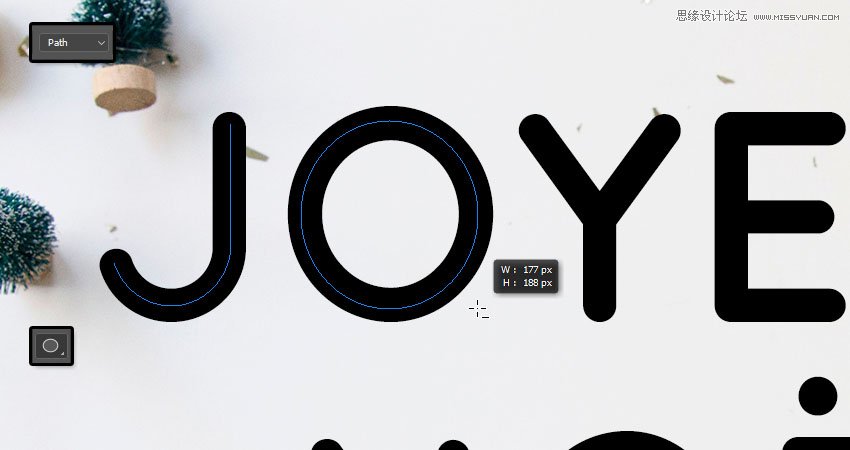
Step 3
Make sure to create all the work paths needed to fill all the letters you have.

Step 4
It is very important to save the paths created. To do so, open the Paths panel, double-click the Work Pathtab, and type Center in the Name field.
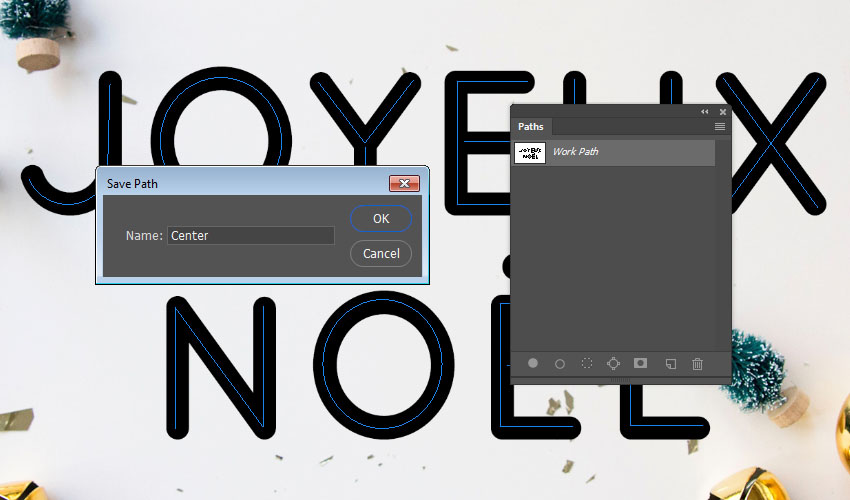
This will save the work paths so that you can go back to them and use them any time.

Step 5
Right-click the text layer and choose Create Work Path to create the outer stroke path.
The dots on top of the letter E are a bit too big and will overlap with the letter when stroked with the tinsel brushes, so we'll create smaller ones.
To do so, pick the Direct Selection Tool, select the dots, and hit the Delete key to delete them.

Step 6
Then, use the Ellipse Tool to create smaller circular paths.
Once you're done, double-click the new Work Path tab and name it Stroke.

 ���㲻Ҫ��
-
 Photoshop�������L�������ƬЧ����Ӣ��2018-04-23
-
 Photoshop�ϳ��L����������L�i¹��Ӣ��2018-04-23
-
 Photoshop�ϳɱ�����Ч�Ľ��~������Ӣ��2018-02-10
-
 Photoshop�ϳɉ����L���ɭ�ֈ�����Ӣ��2018-02-10
-
 Photoshop�ϳ�����ʩ��������Ӣ��2018-02-10
-
 Photoshop���������|�е�3D���w�֡�Ӣ��2018-01-09
-
 Photoshop�OӋ����ȼ��ˇ�g�ֽ̡̳�Ӣ��2018-01-09
-
Photoshop�������L�������ƬЧ����Ӣ��
���P����11882018-04-23
-
 Photoshop�����S���|�����w�֡�Ӣ��
���P����7422018-02-10
Photoshop�����S���|�����w�֡�Ӣ��
���P����7422018-02-10
-
 Photoshop�����@�G����3D���w��
���P����14682018-02-10
Photoshop�����@�G����3D���w��
���P����14682018-02-10
-
 Photoshop�������p���ع����w
���P����6532018-01-09
Photoshop�������p���ع����w
���P����6532018-01-09
-
 Photoshop����ľ�ذ�LOGO��ӡЧ����Ӣ��
���P����19272018-01-09
Photoshop����ľ�ذ�LOGO��ӡЧ����Ӣ��
���P����19272018-01-09
-
Photoshop���������|�е�3D���w�֡�Ӣ��
���P����4612018-01-09
-
Photoshop�OӋ����ȼ��ˇ�g�ֽ̡̳�Ӣ��
���P����7612018-01-09
-
 Photoshop�����Ż���M�ɵ�ˇ�g�֡�Ӣ��
���P����3802018-01-09
Photoshop�����Ż���M�ɵ�ˇ�g�֡�Ӣ��
���P����3802018-01-09
